꾸준히 안타치기
액션시트 / 얼럿 본문
반응형


import UIKit

class ViewController: UIViewController {

    @IBOutlet var result: UILabel! // 알림창결과값
    override func viewDidLoad() {
        super.viewDidLoad()
        // Do any additional setup after loading the view.
    }

    // 버튼
    @IBAction func alert(_ sender: Any) {
        // 메시지창 객체 생성
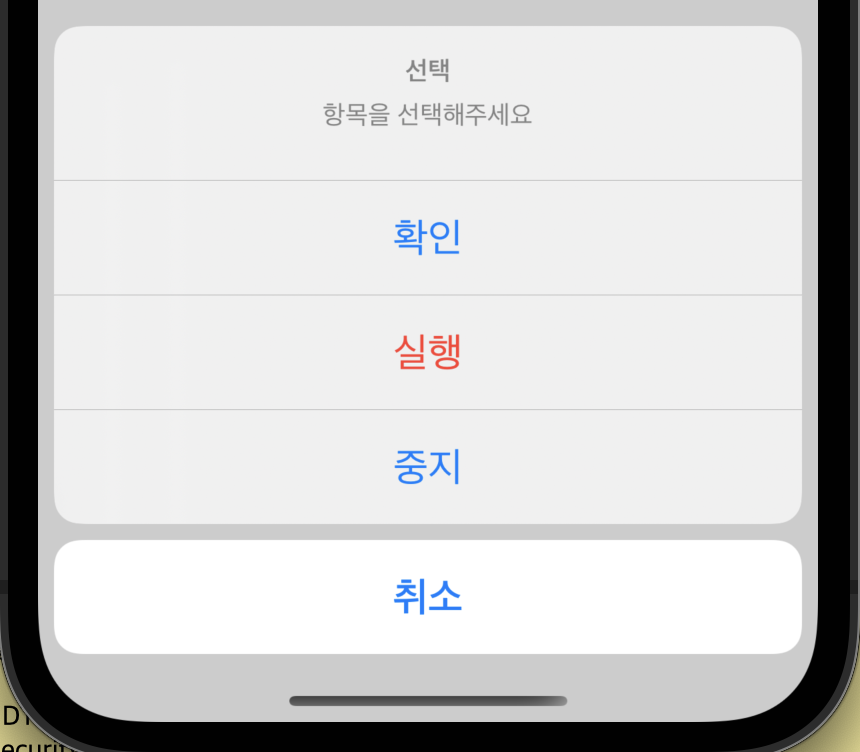
        let alert = UIAlertController(title:"선택", message: "항목을 선택해주세요", preferredStyle: .alert)
        //
        // 취소버튼
        let cancel = UIAlertAction(title:"취소", style: .cancel){ (_) in
            self.result.text = "취소버튼을 클릭했습니다."
        }
        // ok버튼
        let ok = UIAlertAction(title: "확인", style: .default){ (_) in
            self.result.text = "확인 버튼을 클릭했습니다."
        }
        // 실행버튼
        let exec = UIAlertAction(title: "실행", style: .destructive){ (_) in
            self.result.text = "실행 버튼을 클릭했습니다."
        }
        // 중지버튼
        let stop = UIAlertAction(title: "중지", style: .default){ (_) in
            self.result.text = "중지 버튼을 클릭했습니다."
        }

        // 버튼을 컨트롤러에 등록
        alert.addAction(cancel)
        alert.addAction(ok)
        alert.addAction(exec)
        alert.addAction(stop)

        // 메시지창 실행
        self.present(alert, animated: false)
    }

    // 로그인 버튼
    @IBAction func login(_ sender: Any) {

        let title = "앱에 로그인 하기"
        let message = "사용자의 Apple ID julyjun의 암호를 입력하십시오"

        let alert = UIAlertController(title: title, message: message, preferredStyle: .alert)

        let cancel = UIAlertAction(title: "취소", style: .cancel)
        let ok = UIAlertAction(title:"확인",style: .default){  (_) in
            // 확인버튼을 눌렀을때 처리할 내용 *****************
            if let tf = alert.textFields?[0]{
                print("입력된 값은 \(tf.text!)입니다.")
            }else{
                print("입력된 값이 없습니다.")
            }

        }
        alert.addAction(cancel)
        alert.addAction(ok)

        // 텍스트필드 추가 ***************** //아무런설정추가하지 않으려면,configurationHandler를 생략
        alert.addTextField(configurationHandler:{ (tf) in
            // 텍스트필드의 속성설정
            tf.placeholder = "암호" // 안내메시지
            tf.isSecureTextEntry = true // 비밀번호처리
        })

        self.present(alert, animated: false)

    }

    // 아이디 비번입력필드2개 알림창
    @IBAction func login2(_ sender: Any) {
        // 메시지창 관련 객체 정의
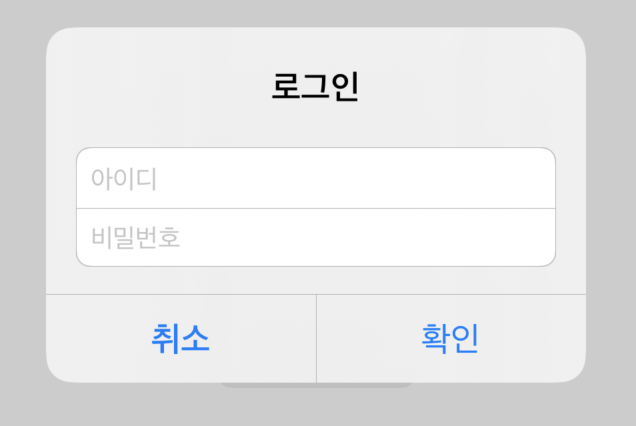
        let msg = "로그인"
        let alert = UIAlertController(title: nil, message: msg, preferredStyle: .alert)
        let cancel = UIAlertAction(title: "취소", style: .cancel)
        let ok = UIAlertAction(title: "확인", style: .default) { (_) in
            // 확인버튼을 눌렀을때 실행할 내용 ***************************

            let loginId = alert.textFields?[0].text
            let loginPw = alert.textFields?[1].text

            if loginId == "june77" && loginPw == "1234"{
                self.result.text = "로그인 성공"
            }else{
                self.result.text = "로그인 실패"
            }
        }
            //정의된 액션 버튼 객체를 메시창에 추가
            alert.addAction(cancel)
            alert.addAction(ok)

            // 아이디 필드추가
            alert.addTextField(configurationHandler: { (tf) in
                tf.placeholder = "아이디" // 미리보여줄 안내메시지
                tf.isSecureTextEntry = false // 입력시(*) 처리함
            })
            // 비번 필드추가
            alert.addTextField(configurationHandler: { (tf) in
                tf.placeholder = "비밀번호" // 미리보여줄 안내메시지
                tf.isSecureTextEntry = true // 입력시(*) 처리함
            })
            self.present(alert, animated: false)
        }
    }
UIAlertController 클래스
UIAlertController 클래스는 사용자에게 표시할 얼럿 또는 액션시트의 구성에 관한 메서드와 프로퍼티를 포함하고 있습니다. UIAlertController 클래스를 통해 얼럿 또는 액션시트를 구성한 후 UIViewController의 present(_:animated:completion:)메서드를 사용하여 사용자에게 얼럿 또는 액션시트를 모달로 보여줍니다.
UIAlertController의 주요 메서드
- init(title:message:preferredStyle:) : 얼럿 뷰 컨트롤러의 객체를 초기화합니다.
- func addAction(UIAlertAction) : 얼럿이나 액션시트에 액션을 추가합니다.
- func addTextField(configurationHandler: ((UITextField) -> Void)? = nil) : 얼럿을 통해 텍스트를 입력받고자 하는 경우 텍스트 필드를 추가합니다.
UIAlertController의 주요 프로퍼티
- var title: String?: 얼럿의 제목입니다.
- var message: String?: 얼럿에 대해 좀 더 자세히 설명하는 텍스트입니다.
- var actions: [UIAlertAction]: 사용자가 얼럿 또는 액션시트에 응답하여 실행할 수 있는 액션입니다.
- var preferredStyle: UIAlertController.Style: 얼럿 컨트롤러의 스타일입니다. 얼럿(alert)과 액션시트(actionSheet)가 있습니다.
UIAlertAction 클래스
사용자가 얼럿 또는 액션시트에서 사용할 버튼과 버튼을 탭 했을 때 수행할 액션(작업)을 구성할 수 있습니다. UIAlertAction 클래스를 사용하여 버튼을 구성한 후 UIAlertController 객체에 추가하여 사용합니다.
UIAlertAction의 주요 프로퍼티
- var title: String?: 액션 버튼의 타이틀입니다.
- var isEnabled: Bool: 액션이 현재 사용 가능한지를 나타냅니다.
- var style: UIAlertAction.Style: 액션 버튼의 적용될 스타일입니다.
UIAlertAction.Style
액션 스타일에는 무엇이 있는지 살펴볼까요?
- default: 액션 버튼의 기본 스타일입니다.
- cancel: 액션 작업을 취소하거나 상태 유지를 위해 변경사항이 없을 경우 적용하는 스타일입니다.
- destructive: 취하게 될 액션이 데이터를 변경되거나 삭제하여 돌이킬 수 없는 상황이 될 수 있음을 나타낼 때 사용하는 스타일입니다.


얼럿과 액션시트는 언제 사용할까?
얼럿
- 중요한 액션을 하기 전 경고가 필요한 경우
- 액션을 취소할 기회를 제공해야 하는 경우
- 사용자의 작업을 한 번 더 확인하거나 삭제 등의 작업을 수행하거나 문제 사항을 알릴 때
- 결정이 필요한 중요 정보를 표시할 경우
https://www.boostcourse.org/mo326/lecture/16864?isDesc=false
iOS 앱 프로그래밍
부스트코스 무료 강의
www.boostcourse.org
액션시트
- 사용자가 고를 수 있는 액션 목록이 여러 개일 경우
- 새 작업 창을 열거나, 종료 여부 확인 시
- 사용자의 결정을 되돌리거나 그 동작이 중요하지 않을 경우
반응형
'iOS > storyboard & code' 카테고리의 다른 글
| swift toast 라이브러리 (0) | 2022.01.01 |
|---|---|
| Stack View (0) | 2021.12.27 |
| 사진첩에서 이미지 가져오기 / 삭제하기 (0) | 2021.12.26 |
| 세그(Segue) / 화면전환 (0) | 2021.12.23 |
| TableVIew / custom (0) | 2021.12.21 |
Comments

